Much of the gear you need for home portraits is the same as what I'm going to outline in Chapter 10, too. The next section will list the basic items you need to have on hand. There's enough overlap that if you're well-equipped for macro photography, you've got most of what you need for individual portraits, too.
Your Portrait Camera
There are a few special requirements for a digital camera that will be used for portraiture. Here's a list of the key things to look for in a digital camera that are ideal for portraiture.

Your Portrait Camera
There are a few special requirements for a digital camera that will be used for portraiture. Here's a list of the key things to look for in a digital camera that are ideal for portraiture.
- Lots of megapixels. Portraiture is one type of photography that places a premium on resolution. Even if you plan on making prints no larger than 5 x 7 inches, you'll find a 5 to 8 megapixel (or more) camera useful, because those extra pixels come in handy when you start retouching your portraits to make your subjects look their best. I think you'll find it hard to resist making 8 x 10 and larger prints of your best efforts, too, so you'll be glad you sprung for a few million more megapixels when you bought your camera.
- A modest zoom lens (at least). Digital cameras with no zoom lens (generally only the lowest of the low-end models) or which have only a 2:1 zoom may not be your best choice for shooting portraits. That's because for the most flattering head-and-shoulders pictures you'll want a lens that has a zoom setting in the 80mm to 105mm (35mm camera equivalent) range. Shorter focal lengths often produce a kind of distortion, with facial features that are closer to the camera (such as noses) appearing much larger in proportion than features that are farther away from the camera (such as ears), as you can see in Figure 6.3. By the time you zoom in to the 135mm to 200mm (or longer) telephoto settings, the reverse effect happens: The camera's perspective tends to flatten and widen the face, bringing nose and ears into the same plane. The 80 to 105mm settings are just about perfect.

Figure 6.3. The wide-angle setting (left) emphasizes subject matter (such as a nose) that is closer to the camera. A more natural look comes from a telephoto setting (right).
- Some way to use multiple flash units. If you want the most control over your lighting, you'll want to use several light sources. Electronic flash is often the best option, so your digital camera should have a way of triggering one or more external flash units that are used separate from the camera. You may be able to connect extra flash units with a standard PC connector (the PC is said to stand for Prontor-Compur, two early shutter manufacturers, not "personal computer"), a hot shoe connector that can accommodate either an external flash or an adapter you can plug an external flash into. Some more advanced digital cameras, particularly digital SLRs, might be able to work with flash triggered wirelessly.
- Filter thread. Although not an essential feature, having a camera with a thread that will accept screw-on filters and other accessories can be very useful. There are some offbeat things you can do with filters, such as put petroleum jelly on the edges of a skylight filter to provide blurry edges, that are a lot harder to duplicate in Photoshop than you might think.
Backgrounds
Backgrounds are an important consideration for more formal portraits. You can get great casual pictures with the gang posed on the couch in the living room, and, in fact, you should try some of the lighting techniques discussed later in this chapter in that sort of an environment. Good lighting can elevate the family room portrait well above the snapshot category. However, if you want a true studio portrait, you're going to have to arrange for a more formal background. Luckily, that's easy to do.
Seamless paper, available in 9- and 12-foot widths and around 36 feet long, is another good choice. As I mention in Chapter 10, you can also get half-rolls for close-ups. A paper backdrop can be easily damaged, becoming wrinkled with handling and dirty as people walk on it. When a piece becomes soiled, you just rip it off and roll off some more. If you can, avoid using seamless paper on thick carpets. They don't provide enough support for the paper, so it rips more easily. A wood floor may be a better choice.
You've probably admired those abstract backgrounds with, perhaps, a cloud effect, or stippled blotches of paint, like the one shown in Figure 6.4. Painted backdrop canvases are available for big bucks from professional photography supply houses, but you can easily make your own, as I did.

Figure 6.4. Dabbing with a sponge and paint on a piece of canvas can create a workable backdrop for portraits.
While professional photographers won't blink an eye at purchasing backdrops they can use repeatedly, most don't hesitate to create their own props and backgrounds to give their photography a customized, personal flavor.
When my studio was in operation professionally, I used the reverse side of 4 x 8 sheets of paneling to create dozens of backgrounds for individual portraits. Of course, I had a permanent studio to store them in. You're probably better off using sheets of awning canvas. The secret is to use a sponge to paint them with colors. You'll be surprised at the results, even if you're not the artistic type. Start painting using lighter colors in the center and work your way toward the edges with darker pigments. The sponge will give the surface an arty splotchy effect that will look great, especially when it's out of focus. Browns and earth colors are recommended for men; brighter colors, especially blues, work well for women and children. Remember, if you make any mistakes or don't like your initial results, you can always paint over them.
Visible Means of Support
The same kind of supports you will be collecting for close-up photography in Chapter 10 will serve you in good stead for people pictures, too. You'll need stands for your background, lighting, and camera, although there are many portrait situations in which you'll want to dispense with a tripod (such as when you're taking photos by electronic flash). Unlike macro photographs, portraits are often taken from a variety of angles and distances.
Whether you're using cloth backdrops, seamless paper, or another background, you'll need some sort of framework to support it. I prefer sturdy light stands for lightweight backgrounds, and ceiling supports for heavier paper rolls. You may not be able or willing to nail anything to your ceiling (this is one instance when having a basement or attic is great), but you can still build some sort of easily disassembled framework to hold your backdrop.
Light stands make good supports, and are a once-in-a-lifetime investment. Unless you manage to lose one, they'll last forever. You'll need to add clamps or other fasteners to fix your lights and, perhaps, umbrellas to the stands.
A tripod is not essential for people photography, particularly if you're using motion-stopping electronic flash, and in many cases a tripod can be detrimental. You'll want to be able to roam around a little to get various angles, move in and out to change from full-length or three-quarters portrait to close-up. For Figure 6.5, my niece Sabrina wouldn't sit still for a formal portrait, but because my camera wasn't mounted on a tripod, I was able to move around to the side and catch her as she looked back at me.
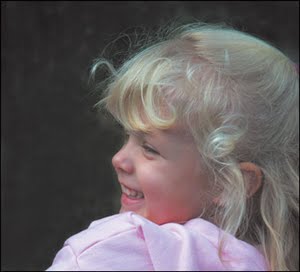
Figure 6.5. Electronic flash and a handheld camera lead to spontaneous poses.
The only time you'll really need a tripod for portraits is when you need to lock down the camera to get a precise composition, or when you're working with relatively low light levels and need the tripod to steady the camera. For example, you might be shooting a series of head shots for your company and would like each photo to be taken from the exact same distance and angle. Or, you may be taking pictures using diffused window light or with household lamps as your illumination. In both cases a tripod can be useful as a camera support.
Make Light Work for You
Lighting is one of the most important tools for creative portraiture. The way you arrange your illumination can have a dramatic effect on the mood of a photo. Lighting can focus interest on your subject. You can even use lighting techniques to improve the looks of a subject with less-than-perfect features. You'll find that portrait lighting is a great deal more complex than the lighting you might use for many other types of subjects. Close-ups need to be lit carefully, and your scenic and architectural pictures will look better if the illumination is just so. For sports photography, much of the time you won't even have much control over the kind of light you use. Portraiture, on the other hand, looks best when the lighting is carefully crafted.
As a result, while very good portraits can be taken with just one light source, you'll find that mastering multiple light sources opens new creative avenues. But note that I said multiple light sources. You don't have to encumber your home or office studio with dozens of different lighting fixtures. Often, a skylight, window, or reflector can serve as an effective light source. Outdoors, you may work with the light from the sun, supplemented by reflectors or electronic flash. You'll learn how to use these light sources later in this chapter.
Here are your choices:
Existing Light
The existing light indoors or outdoors can be perfect for good people pictures. Rembrandt reportedly cut a trapdoor in the ceiling of his studio and used that to illuminate many of his portraits. If you have a room with a skylight, you may find that suitable for portraits at certain times of day. Some memorable pictures have been taken using only the soft light that suffuses from a window. Indeed, you'll find references to "north light" (a window orientation that produces diffuse light from dawn to dusk) throughout painting and photographic literature.
Just because the lighting is already there doesn't mean you can't modify it to your advantage. You can lower the blinds part way to reduce or soften window light. You can use reflectors to bounce light around in interesting ways.
Electronic Flash
Electronic flash is often the best choice for indoor portraiture. The short duration of flash captures a moment in a fraction of a second, without danger of blur from a slow shutter speed. The high intensity of flash means you can use small f-stops if you want, so all of your subject will be in sharp focus. Flash can be reduced in intensity, as well, giving you the option of using selective focus, too. Flash can be harsh and direct, or soft and diffuse.
The chief problem with electronic flash is that it is difficult to preview how flash illumination will appear in the final picture. Fortunately, there are ways to overcome this limitation, as I'll show you later in this section. A second problem is that many digital cameras don't have a connector that lets you plug in an external flash, as I mentioned earlier.
Electronic flash comes in many forms, from the built-in flash on your digital camera to external battery-powered units to "studio" flash that operate from AC power or large battery packs. Unless you're moving into portraiture in a big way, you don't need studio flash units. If you do decide to make the investment, there are some surprisingly economical AC-powered studio flash setups for serious amateurs and pros on a budget. A single-unit (flash head and power supply in one module) "monolite" can cost less than $200.
You certainly should investigate external battery-powered flashes that are compatible with your digital camera. Many digital cameras cannot use electronic flash intended for film cameras, because conventional flash units use a voltage to trigger the flash (through a switch in the camera) that is too high, and likely to fry the electronics of a digital model. Digital cameras may also work only with dedicated external flash units that integrate with the camera's exposure system. Unless you have such a dedicated flash, you'll want a digital camera that has manual exposure settings that can be used with any external flash unit.
Some add-on flash units have a built-in device called a slave sensor that triggers the flash when the sensor detects another unit firing. These can be safely used with any camera, as they have no direct connection to the camera. You can also purchase detectors that attach to any flash unit, turning it into a slave flash.
If you're using an external flash, make sure you turn off your digital camera's internal flash unit, especially if you don't want it to trigger a slave unit. Some digital camera models require you to have the internal flash flipped up, even if disabled, to activate the external flash connector. Check your camera's instruction manual carefully to see exactly what you need to do to use an external flash unit.
If you use your electronic flash on stands, you may be able to rig an incandescent light along each side to give you some indication of what your lighting looks like. These "modeling" lights work especially well if your electronic flash is pointed at a reflector such as an umbrella. That's because the softening effect of the umbrella reduces the variation in illumination that results when the flash and incandescent lamp aren't in precisely the same position.
The ability to see the exact light you're going to get can be very important. For Figure 6.6, I carefully manipulated the lights so the model's hat fell into shadow, and most of the right side of her face was in shadow as well, except for the dangling earring. You can't achieve lighting effects like this on a hit or miss guesstimate basis.

Figure 6.6. Careful lighting can produce effects like this, in which the earring stands out sharply from the shadows.
Incandescent Lights
You'll find that incandescent lights are inexpensive, easy to set up, and make it simple to preview your lighting effects. You never have to worry about what your lighting will look like if you use incandescent lamps.
Unfortunately, lamps are not as intense as flash and may not provide enough illumination for good handheld exposures at short shutter speeds. Or, if the lamps are intense enough, they may be too hot to pose under for long periods of time. In addition, incandescent lamps are much redder than the illumination provided by daylight or electronic flash, so you may have to change your camera's whitebalance control to compensate. (Many digital models have automatic white-balance control, but it's not foolproof.)
While you can use just about any light, you might want to investigate incandescent lamps made especially for photography, available from your local camera shop or online photo retailer. They aren't overly expensive, and are easier to buy hardware for, such as mounting clamps, umbrella adapters, and so forth.
Gadgets
There are dozens of different gadgets and accessories associated with portraiture. The best news is that you can make many of them yourself, so you don't have to pay a lot of money to spice up your portrait-shooting arsenal. Here are some versatile gadgets you might want to consider.
Flat Reflectors
Reflectors bounce some of the illumination from other light sources onto your subject, serving as a low-cost secondary light source in their own right. Large sheets of foamboard (which you can stand up and lean against things at the proper angle), poster board, Mylar sheets, or anything that reflects light can be used.
Soft Boxes
Soft boxes are similar in concept to photographic tents, which I discuss in Chapter 10. Both operate by using diffuse white material, such as cloth, to create a soft lighting effect. A tent is a white, usually cubical box that fits around the subject (usually for close-ups) and diffuses any light you apply to the outside. A soft box operates in a similar way, except it fits around the light source. Soft boxes can simulate window light and create a diffuse, flattering illumination suitable for photography of women, children, teens, and any adult men who aren't tenacious about preserving those craggy furrows they think of as facial character lines. A kind of mini soft box can be purchased for electronic flash units that are normally used on the camera, to diffuse the light. There's no reason why one of these units, shown in Figure 6.7, can't be used with an offcamera flash, too.

Figure 6.7. Flash diffusers are a sort of mini soft box.
Gobos and Cookies
Gobos and cookies are the opposite of a reflector. They can be a black drape or sheet placed between a light source and the subject to block some light, and are handy when you have an unwanted light source, such as a window, that's spoiling the effect you want. These items are actually more of a tool for video and cinema photographers and for stage productions, because they can include cutouts that let some light through to produce an interesting combination of light and shadows, such as window frames, trees, or logos. However, still photographers should know about them and use them when appropriate.
Barndoors/Snoots
These are devices that limit where the light from a flash or lamp goes. A barndoor has two or four hinged flaps you can move into or out of the path of the light. Subtle adjustments can be made to "feather" the light on your subject. Snoots are conical devices that focus the light down to a narrow spot. They are excellent for creating a light that illuminates a small area, such as the hair of the subject.
You can easily make your own barndoors or snoots out of cardboard or tin (which is a better choice for accessories used near hot incandescent lamps). Spray paint them with black heat-resistant barbeque grill paint. Or, use purchased units, like those shown in Figure 6.8.

Figure 6.8. Barndoors and snoots let you direct the light carefully.
Umbrellas
A good set of umbrellas is the best investment you can make for portrait photography. Umbrellas soften the light in ways you can control and use for artistic effect. You can bounce light off an umbrella onto your subject, or, in the case of translucent white umbrellas, shine your illumination through the fabric for an especially diffuse effect. In either mode, a soft-white umbrella provides very diffuse illumination, but you can also purchase umbrellas with opaque shiny silver or gold interiors that provide a broad light source that still has snap and contrast. Umbrellas produced for professional photographers are compatible with various lighting clamp systems that make them easy to set up and manipulate.
However, you can also use ordinary umbrellas of the type people take out into the rain. I found a source selling white umbrellas that collapse down to less than a foot in length for about $5 each. I really liked these when I was a traveling photojournalist who was unable to travel light (two or three cameras, five or six lenses, and two electronic flash units were my minimum kit), but tried to trim weight where ever I could. I picked up a dozen and found I could hold the umbrella and flash unit in my left hand and shoot with the camera held in my right hand. You can jury-rig clamps to hold them to light stands or other supports. Collapsible umbrellas usually have small diameters and must be used relatively close to get a soft, wrap-around lighting effect. Larger sizes are needed to provide illumination from greater distances (say, 10 to 12 feet).
No comments:
Post a Comment