Lighting is the palette you'll be using to paint your photographic portraits. The next two sections will introduce you to some basic techniques, using some diagrams I've put together that will help you set up professional-looking lighting on your first try. However, you don't need to stick to the setups I'm going to describe anymore than you'd want to paint using only one shade each of red, blue, green, yellow, orange, or other colors. Once you understand how various types of lighting affect your portrait, you'll want to expand on the basic techniques to achieve special looks of your own devising. This section covers some basics.
The Nature of Light
The character of the light you use is just as important as the direction it comes from. As a photographer, you probably already know that light can be hard and harsh, or soft and gentle. Neither end of the spectrum is "good" or "bad." Each type of light, and all the gradations in between, has its own advantages and disadvantages.
A spotlight or a lamp in a reflector, or an electronic flash pointed directly at a subject is highly directional and produces a hard effect. Hard light is harsh because all the light comes from a relatively small source. This kind of light can be good if you want to emphasize the texture of a subject, and are looking for as much detail and sharpness as possible. In fact, many kinds of photographic projection and optical gear take advantage of point-source lighting to maximize sharpness. A photographic enlarger, for example, may be equipped with such a source to get the sharpest possible image from a piece of film. Of course, the point-source light emphasizes any scratches or dust on the film, so the technique works best with originals that are virtually perfect from a physical standpoint.
Most portrait subjects benefit from a softer light, like that used in Figure 6.9. You can soften this light in many ways, using umbrellas, diffusers, and other techniques. It's even possible to add a little softness in Photoshop, as I did with this particular photo.

Figure 6.9. Soft illumination works best for many subjects, including women.
Direct versus Soft
As I've noted, direct light is not as good a choice for portraiture. People rarely look their best under a direct light, because even a baby's skin is subject to imperfections that we don't see under home illumination (which is deliberately designed to be non-harsh). Only in direct sunlight are we likely to look our worst. Figure 6.10 shows how a direct light focuses a sharp beam on a human subject.
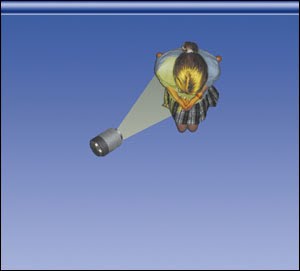
Figure 6.10. A direct light forms a sharp beam of high-contrast light on your subject.
Most portraits are made using softer illumination, such as that produced by bouncing light off an umbrella. As the light strikes the umbrella (or other soft reflector), the light scatters. It bounces back towards the subject and appears to come from a much larger source—the umbrella itself rather than the bulb or flash unit that produced it. Figure 6.11 shows a much softer beam of light bounced onto the subject from an umbrella. Of course, the light is bouncing in all directions and spreading out, but my illustration shows just the cone of light falling on the subject. The blunt "apex" of this cone gets smaller the farther away you move the light, and larger the closer it gets.

Figure 6.11. Bouncing light from an umbrella produces a much softer light source.
But you probably already guessed by now that the distance of the light source from the subject also has a bearing on the quality of light. In Figure 6.11, the umbrella is fairly far from the subject, so the light source seems to come from a relatively small area, even though it's bouncing off an umbrella. The effect is less harsh than direct light, of course, but still not as good as we can achieve.
For Figure 6.12, I moved the umbrella in much closer to the subject, making the blunt end larger. The apparent source of the light is now much broader, relatively, and correspondingly softer. You'll need to keep this characteristic in mind as you set up your lights for portraiture. If you need to move a light back farther from the subject, you'll also need to take into account the changing nature of the light. A larger umbrella may help keep the lighting soft and gentle. Or, you simply might want to have slightly "edgier" lighting for your subject. As long as you are aware of the effect, you can control it.

Figure 6.12. Moving the light in closer provides an even broader, softer effect.
Balancing Light
As you'll see in the next section, you'll often be using multiple illumination sources to light your portraits. It's important to understand some of the principles that go into balancing light from several different sources in a single photograph. Here are some tenets to work by:
The Inverse Square Law
Moving a light source twice as far away reduces the light by 4x (not 2x). In photographic terms, that translates into two f-stops, not one f-stop, to compensate. For example, a light source placed 8 feet from your subject will provide onequarter as much illumination as the same source located just 4 feet from the subject. After moving the light twice as far away, you'd have to open up two f-stops to keep the same exposure, as shown in Figure 6.13.

Figure 6.13. Moving a light source twice as far away cuts its effective illumination by four times (two f-stops).
You can make the inverse square law work for you. If you find a source is too strong, either by itself or relative to other light sources you're using, simply moving it twice as far away will reduce its strength to one-quarter its previous value. Or, should you need more light, you can gain two f-stops by moving a light source twice as close. (Keep in mind that the softness of the light is affected by the movement, too.)
There are times when you won't want to adjust the light intensity entirely by moving the light because, as you've learned, the farther a light source is from the subject, the "harder" it becomes. In those cases, you'll want to change the actual intensity of the light. This can be done by using a lower power setting on your flash, switching from, say, a highly reflective aluminum umbrella to a soft white umbrella, or by other means.
Using Ratios
When lighting a subject, the most common way to balance light is to use ratios, which are easy to calculate by measuring the exposure of each light source alone (either with your camera's exposure meter or using an external flash meter). Once you have the light calculated for each source alone, you can figure the lighting ratio.
For example, suppose that the main light for a portrait provides enough illumination that you would use an f-stop of f11. The supplementary light you'll be using is less intense, is bounced into a more diffuse reflector, or is farther away (or any combination of these) and produces an exposure, all by itself, of f5.6. That translates into two f-stops' difference or, putting it another way, one light source is 4 times as intense as the other. You can express this absolute relationship as the ratio 4:1. Because the main light is used to illuminate the highlight portion of your image, while the secondary light is used to fill in the dark, shadow areas left by the main light, this ratio tells us a lot about the lighting contrast for the scene. (I'll explain more about main and fill lights shortly.)
In practice, a 4:1 lighting ratio (or higher) is quite dramatic and can leave you with fairly dark shadows to contrast with your highlights. For portraiture, you probably will want to use 3:1 or 2:1 lighting ratios for a softer look that lets the shadows define the shape of your subject without cloaking parts in inky blackness.
If you use incandescent lighting or electronic flash equipped with modeling lights, you will rarely calculate lighting ratios while you shoot. Instead, you'll base your lighting setups on how the subject looks, making your shadows lighter or darker depending on the effect you want. If you use electronic flash without a modeling light, or flash with modeling lights that aren't proportional to the light emitted by the flash, you can calculate lighting ratios. If you do need to know the lighting ratio, it's easy to figure by measuring the exposure separately for each light and multiplying the number of f-stops difference by two. A two-stop difference means a 4:1 lighting ratio; two-and-a-half stops difference adds up to a 5:1 lighting ratio; three stops is 6:1 and so forth.
Figure 6.14 shows an example of 4:1, 3:1, and 2:1 lighting ratios.

Figure 6.14. Left: a 4:1 lighting ratio; middle: a 3:1 lighting ratio; right: a 2:1 lighting ratio.
No comments:
Post a Comment