This section provides an overview of the range of RAW file viewers, so you can get a better idea of the kinds of information available with particular applications. I'm going to include both high-end and low-end RAW browsers so you can see just what is available and then move on to Photoshop's Camera RAW plug-in.
Camera Vendor Solutions
You may prefer to use the RAW image processing software provided by your camera's manufacturer. Most of these have all the features you need to apply settings to your RAW files as they are imported, along with the ability to save the processed file in TIFF, JPEG, or other format. Nikon and Canon offer two of the bestknown RAW converters.
Nikon Capture
Nikon Capture is a $99 RAW converter/editor application that works with JPEG, TIFF, or NEF (Nikon's RAW format) files. You can make modifications to a RAW format file and then resave it as a RAW file with adjustments, while retaining the original information in case you want to revert to an earlier state or make additional changes later on. Nikon Capture is shown in Figure 4.4. If you don't want to pay extra, Nikon Picture Project can convert RAW files, and comes in the box with your camera.

Figure 4.4. Nikon Capture 4 provides access to all options in a Nikon NEF (RAW) file.
One handy feature is the ability to "defish" images taken with fish-eye lenses, producing a non-distorted rectilinear image that no longer has the fish-eye qualities. Supported lenses include the DX Nikkor 10.5mm fish-eye, which produces an image equivalent to a 16mm lens on a 35mm film camera. When such images are defished, they produce super-wide rectangular photos with some loss of sharpness in the corners, but which are still quite usable. Nikon Capture gives you direct control over curves, levels, brightness/contrast, color balance, unsharp masking, optional color noise reduction, and exposure compensation.
Most settings are accessed by expanding the Tool Palette to produce controls like those shown in Figure 4.5. These include the LCH Editor, which lets you make adjustments to lightness, chroma, and hue separately. There's also an Image Dust Off feature: Take a dust reference image with your camera, and Nikon Capture will remove dust spots from a batch of images.
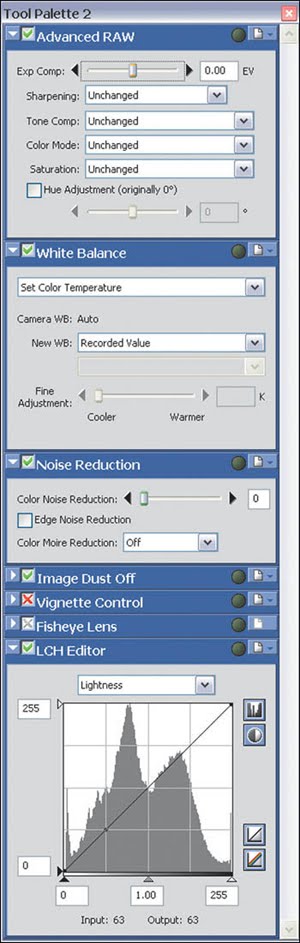
Figure 4.5. Expandable palettes reveal hidden controls.
Batch processing lets you convert a whole folder of images using the same settings. A folder can be set on "watch" status and Nikon Capture will process any new images dropped into the folder as they arrive. Those who want to control their camera remotely can use the application's remote capture feature to take pictures on cue, or on a regular schedule in timelapse mode.
Canon EOS File Viewer Utility/EOS Capture/Digital Photo Professional
Canon provides these software utilities for viewing/converting images taken with Canon cameras, and for controlling the camera remotely. The File Viewer Utility is not highly regarded by Canon users, who often opt for a third-party solution. Or, Digital Photo Professional is preferred for those Canon dSLR cameras that are supported by it.
DPP, shown in Figure 4.6 offers much higher-speed processing of RAW images than was available with the sluggardly File Viewer Utility (as much as six times faster). Canon says this utility rivals third-party stand-alone and plug-in RAW converters in speed and features. It supports both Canon's original .CRW format and the newer CR2 RAW format, along with TIFF, Exif TIFF, and JPEG.

Figure 4.6. Canon's Digital Photo Professional offers a full array of conversion features.
You can save settings that include multiple adjustments and apply them to other images and use the clever comparison mode to compare your original and edited versions of an image either side-by-side or within a single split image. The utility allows easy adjustment of color channels, tone curves, exposure compensation, white balance, dynamic range, brightness, contrast, color saturation, ICC Profile embedding, and assignment of monitor profiles. A new feature is the ability to continue editing images while batches of previously adjusted RAW files are rendered and saved in the background.
Other Proprietary RAW Converters
There isn't room in this chapter to provide even brief overviews of the similar software available from the manufacturers of the other dSLRs. You'll find that Olympus, Pentax, Minolta, and other vendors of digital SLRs provide similar programs with the same types of features. If your particular camera's RAW converter doesn't do everything you like, you'll want to explore one of the third-party solutions discussed next.
Note that most of the products with a price tag can be downloaded for 30-day free trials, including the likes of Bibble and Capture One. The URLs for these downloads change frequently (Phase One, for example, is based in Denmark, but makes its products available for download through other distributors), so if you'd like to try one of these out, do a Google search for the latest link.
Third-Party Solutions
You'll find that RAW file utilities are available from a wide range of suppliers and can cost you nothing (in the case of IrfanView), or be included in the cost of other software (which is the case with Photoshop). Or, you can pay $129 for a sophisticated program like Bibble Professional, or as much as $500 for a top-of-the-line program like PhaseOne's Capture One Pro (C1 Pro).
IrfanView
At the low (free) end of the scale is IrfanView, a freeware program you can download at www.irfanview.com. It can read many common RAW photo formats, like the Minolta format shown in Figure 4.7. It's a quick way to view RAW files (just drag and drop to the IrfanView window) and make fast changes to the unprocessed file. You can crop, rotate, or correct your image, and do some cool things like swapping the colors around (red for blue, blue for green, and so forth) to create false color pictures.

Figure 4.7. IrfanView is a freeware program that can read many RAW file formats.
The price is right, and IrfanView has some valuable capabilities if you're a Windows user. Mac owners should try GraphicConverter, which costs $29.95 and is available from www.lemkesoft.com.
Phase One Capture One Pro (C1 Pro)
If there is a Cadillac of RAW converters for Nikon and Canon digital SLR cameras, C1 Pro has to be it. This premium-priced program does everything, does it well, and does it quickly. If you can't justify the price tag of this professional-level software, there are "lite" versions for consumer, serious amateur, and cash-challenged professionals called Capture One dSLR and Capture One dSLR SE.
Aimed at photographers with high-volume needs (that would include school and portrait photographers, as well as busy commercial photographers), C1 Pro (shown in Figure 4.8) is available for both Windows and Mac OS X and supports a broad range of Nikon and Canon digital cameras. Phase One is a leading supplier of megabucks digital camera backs for medium and larger format cameras, so they really understand the needs of photographers.

Figure 4.8. Phase One's C1 Pro is fast and sophisticated.
The latest features include individual noise reduction controls for each image, automatic levels adjustment, a "quick develop" option that allows speedy conversion from RAW to TIFF or JPEG formats, dual-image side-by-side views for comparison purposes, and helpful grids and guides that can be superimposed over an image. Photographers concerned about copyright protection will appreciate the ability to add watermarks to the output images.
Bibble Pro
One of my personal favorites among third-party RAW converters is Bibble Pro (shown in Figure 4.9), which just came out with a new version as I was writing this book. It supports one of the broadest range of RAW file formats available, including NEF files from many Nikon Coolpix models, plus Nikon D1, D1x/h, D2H, D2x, D100, D70, D70s; .CRW files from the Canon C30/D60/10D/ 300D; .CR2 files from the Canon 1D MKII; .ORF files from the Olympus E10/E20/E1/C5050/C5060; .DCR files from the Kodak 720x/760/14n; .RAF files from the Fuji S2Pro; .PEF files from Pentax ISTD; .MRW files from the Minolta Maxxum; and .TIF from Canon 1D/1DS.

Figure 4.9. Bibble Pro supports a broad range of RAW file formats.
The utility supports lots of different platforms, too. It's available for Windows, Mac OS X, and, believe it or not, Linux.
Bibble works fast because it offers instantaneous previews and real-time feedback as changes are made. That's important when you have to convert many images in a short time. (Event photographers will know what I am talking about!) Bibble's batch processing capabilities also let you convert large numbers of files using settings you specify without further intervention.
Its customizable interface lets you organize and edit images quickly and then output them in a variety of formats, including 16-bit TIFF and PNG. You can even create a web gallery from within Bibble. I often find myself disliking the generic filenames applied to digital images by cameras, so I really like Bibble's ability to rename batches of files using new names that you specify.
Bibble is fully color managed, which means it can support all the popular color spaces (Adobe sRGB and so forth) and use custom profiles generated by thirdparty color management software. There are two editions of Bibble, a Pro version and a Lite version. Because the Pro version is reasonably priced at $129, I don't really see the need to save $60 with the Lite edition, which lacks the top-line's options for tethered shooting, embedding IPTC-compatible captions in images, and use as a Photoshop plug-in (if you prefer not to use in stand-alone mode).
BreezeBrowser
BreezeBrowser, shown in Figure 4.10, has long been the RAW converter of choice for Windows-using Canon dSLR owners who were dissatisfied with Canon's lame File Viewer Utility. It works quickly, and has lots of options for converting CRW files to other formats. You can choose to show highlights that will be blown out in your finished photo as flashing areas (so they can be more easily identified and corrected), use histograms to correct tones, add color profiles, auto rotate images, and adjust all those raw image parameters, such as white balance, color space, saturation, contrast, sharpening, color tone, EV compensation, and other settings. You can also control noise reduction (choosing from low, normal, or high reduction), evaluate your changes in the live preview, and then save the file as a compressed JPEG, or as either an 8-bit or 16-bit TIFF file. BreezeBrowser can also create HTML web galleries directly from your selection of images.

Figure 4.10. BreezeBrowser makes converting Canon RAW files a breeze.
Manipulating RAW Files in Photoshop CS
The latest version of Photoshop includes a built-in RAW plug-in that is compatible with the proprietary formats of a growing number of digital cameras, both new and old, including the positively ancient image file from the Kodak DCS 460, right up to the latest, as shown in Figure 4.11.
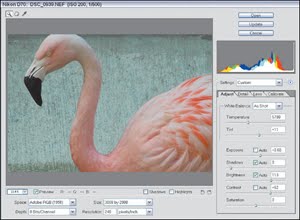
Figure 4.11. The main Camera Raw window has a broad selection of parameters you can change.
The list of supported cameras at the time this book was published is a long one, as shown in Table 4.1.
Camera Vendor Models Supported | |
|---|---|
Canon | EOS-1D, EOS 1D Mark II, EOS-1Ds, EOS-1Ds Mark II, EOS-10D, EOS-20D, EOS 300D, EOS 350D (Digital Rebels), EOS-D30, EOS-D60 |
Nikon | D1, D1H, D1X, D2x, D50, D70, D70s, D100, D2h, D2hs, D200 |
Konica Minolta | Maxxum 7D, Maxxum 5D |
Fujifilm | FinePix S2 Pro, FinePix S20 Pro, FinePix S3 Pro |
Olympus | E-1, E-10, E-20, EVOLT |
Leaf | Valeo 6, Valeo 11, Valeo 22 |
Contax | N Digital |
Pentax | * ist D, *ist Ds, *ist Dl |
Sigma | SD9, SD10 |
Kodak | DCS 14n, DCS Pro 14nx, DCS 720x, DCS 760, DCS Pro SLR /n, DCS 460 |
To open a RAW image in Photoshop CS 2.0, just follow these steps:
- Transfer the RAW images from your camera to your hard drive.
- Choose Open from the File menu, or use Photoshop's File Browser.
- Select a RAW image file. The Camera RAW plug-in will pop up, showing a preview of the image, like the one shown in Figure 4.11.
- Rotate the preview image using the Rotate Preview buttons.
- Zoom in and out using the Zoom tool.
- Adjust the RGB levels using the Histogram and RGB Levels facilities.
- Make other adjustments (described in more detail below).
- Click OK to load the image into Photoshop using the settings you've made.
Photoshop's Camera RAW plug-in lets you manipulate many of the settings you can control within your camera. Here are some of the most common attributes you can change. This is an overview only. Check your Photoshop HELP files for more detailed information on using these controls.
- Color Space. It's possible your digital camera lets you choose from among several different color space profiles, such as Adobe RGB or sRGB. The RAW file will be saved by the camera using the camera's native color space. You can change to another color space using the Space drop-down list shown at lower left in Figure 4.11.
- Depth. Here you'll choose 8 bits or 16 bits per color channel. Photoshop CS now supports more functions using 16-bit channels, so you might want to preserve the full depth of information available.
- Pixel Size. Usually, you'll choose to open the image at the same resolution it was recorded at. If you plan to resample to a larger or smaller size, you might find that carrying out this step on the RAW file yields better results because of the new algorithm incorporated in this version of the plug-in.
- Resolution. This is the resolution that will be used to print the image. You can change the printing resolution to 300 or 600 pixels per inch (or some other value) to match your printer.
- White-balance. You can change this to a value such as Daylight, Cloudy, Shade, Tungsten, Fluorescent, or Flash, or leave it at As Shot, which would be whatever white balance was set by your camera (either automatically or manually). If you like, you can set a custom white balance using the Temperature and Tint sliders.
- Exposure. This slider adjusts the overall brightness and darkness of the image. Watch the histogram display at the top of the column change as you make this adjustment, as well as those for the four sliders that follow.
- Shadows. This slider adjusts the shadows of your image. Adobe says this control is equivalent to using the black point slider in the Photoshop Levels command.
- Brightness. This slider adjusts the brightness and darkness image, similarly to the Exposure slider, except that the lightest and darkest areas are clipped off, based on your Exposure and Shadow settings, as you move the control.
- Contrast. This control manipulates the contrast of the midtones of your image. Adobe recommends using this control after setting the Exposure, Shadows, and Brightness.
- Saturation. Here you can manipulate the richness of the color, from zero saturation (gray, no color) at the -100 setting to double the usual saturation at the +100 setting.
Additional controls are available on the Detail, Lens, and Calibrate tabs, shown in Figures 4.12, 4.13, and 4.14.

Figure 4.12. The Detail tab lets you adjust sharpness and noise attributes of your image.

Figure 4.13. The Lens tab has settings for technical lens corrections.

Figure 4.14. The Calibrate tab provides a way for calibrating the color corrections made in the Camera RAW plug-in.
- Sharpness. This slider applies a type of unsharp masking using a sophisticated algorithm that takes into account the camera you're using, the ISO rating you used, and other factors. If you're planning on editing the image in Photoshop, Adobe recommends not applying sharpening to the RAW image.
- Luminance Smoothing/Color Noise Reduction. Both these sliders reduce the noise that often results from using higher ISO ratings. Each control works with a different kind of noise. Luminance noise is the noise caused by differences in brightness, while color noise results from variations in chroma.
- Lens Tab settings. These are technical adjustments you can use to compensate for weaknesses in your lens' design. Most of us don't have the slightest idea what these are, and can safely ignore them.
- Calibrate Tab settings. These settings let you make calibrations in the way the Camera RAW plug-in adjusts hues, saturation, or shadow tints. If you consistently find your images end up too red, blue, or green, or have a color cast in the shadows, you can make an adjustment here.
No comments:
Post a Comment