Although I'll describe each of the most common lighting techniques, you'll want to set up some lights and see for yourself exactly how they work.
Short Lighting
Short lighting and broad lighting (discussed next) are two different sides of the same coin. Together, they are sometimes referred to as "three-quarter lighting," because in both cases the face is turned to one side so that three quarters of the face is turned toward the camera, and one quarter of the face is turned away from the camera.
Short lighting, also called narrow lighting, is produced when the main light illuminates the side of the face turned away from the camera, as shown in the bird'seye view in Figure 6.19. Because three-quarters of the face is in some degree of shadow and only the "short" portion is illuminated, this type of lighting tends to emphasize facial contours. It's an excellent technique for highlighting those with "interesting" faces. It also tends to make faces look narrower, because the "fat" side of the face is shadowed, so those with plump or round faces will look better with short lighting. Use a weak fill light for men to create a masculine look.

Figure 6.19. With short lighting, the main light source comes from the side of the face directed away from the camera.
This is a very common lighting technique that can be used with men and women, as well as children.
In Figure 6.20, our subject is looking over the photographer's right shoulder. The main light is at the right side of the setup, and the fill light is at the photographer's left. Because the fill light is about twice as far from the subject as the main light, if both lights are of the same power, the fill light will automatically be only onequarter as intense as the main light (thanks to the inverse-square law). If the shadows are too dark, move the fill light closer, or move the main light back slightly.

Figure 6.20. A typical portrait illuminated using short lighting looks like this.
Broad Lighting
In many ways, broad lighting, the other three-quarter lighting technique, is the opposite of short lighting. The main light illuminates the side of the face turned toward the camera. Because most of the face is flooded with soft light (assuming you're using an umbrella or other diffuse light source, as you should), it deemphasizes facial textures (teenagers may love this effect) and widens narrow or thin faces. Figure 6.21 is the lighting diagram used to produce the image shown in Figure 6.22, which pictures the same subject as above, but with broad lighting instead. Broad lighting may not be the best setup for this teenager, because she has a broad face, but styling her hair so it covers both sides of her face reduces the effect. That let me use broad lighting and its feature-flattering soft light.

Figure 6.21. This diagram shows how the lights are arranged for a typical broad lighting setup. Remember, you can also use a mirror image of this arrangement.

Figure 6.22. A portrait made using broad lighting de-emphasizes facial textures.
Butterfly Lighting
Butterfly lighting was one of the original "glamour" lighting effects. The main light is placed directly in front of the face above eye-level and casts a shadow underneath the nose. This is a great lighting technique to use for women, because it accentuates the eyes and eyelashes, and emphasizes any hollowness in the cheeks, sometimes giving your model attractive cheekbones where none exist. Butterfly lighting de-emphasizes lines around the eyes, any wrinkles in the forehead, and unflattering shadows around the mouth. Women love this technique, for obvious reasons. Butterfly lighting also tends to emphasize the ears, making it a bad choice for men and women whose hairstyle features pulling the hair back and behind the ears.
Butterfly lighting is easy to achieve. Just place the main light at the camera position, and raise it high enough above eye-level to produce a shadow under the nose of the subject. Don't raise the light so high the shadow extends down to his or her mouth. The exact position will vary from person to person. If a subject has a short nose, raise the light to lengthen the shadow and increase the apparent length of the nose. If your victim has a long nose, or is smiling broadly (which reduces the distance between the bottom of the nose and the upper lip), lower the light to shorten the shadow.
You can use a fill light if you want, also placed close to the camera, but lower than the main light, and set at a much lower intensity, to reduce the inkiness of the shadows. Figure 6.23 is the diagram for applying butterfly lighting (without a fill light), while Figure 6.24 shows the final result. Notice that the ears aren't a problem with this portrait, because they are hidden behind the model's hair. Because this young woman has blonde hair, I've toned back on the use of hair light in all the photos.
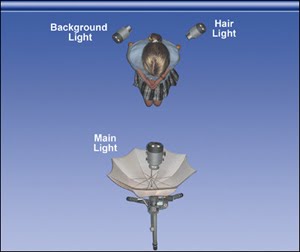
Figure 6.23. This diagram shows the basic arrangement for butterfly lighting.
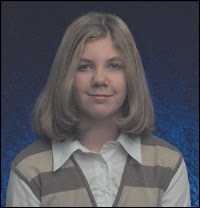
Figure 6.24. Butterfly lighting is a great glamour lighting setup.
Rembrandt Lighting
Rembrandt lighting is another flattering lighting technique that is better for men. It's a combination of short lighting (which you'll recall is good for men) and butterfly lighting (which you'll recall is glamorous, and therefore good for ugly men). The main light is placed high and favoring the side of the face turned away from the camera, as shown in Figure 6.25. The side of the face turned towards the camera will be partially in shadow, typically with a roughly triangular patch of light under the eye on the side of the face that is closest to the camera. For Rembrandt lighting, place the light facing the side of the face turned away from the camera, just as you did with short lighting, but move the light up above eye-level. If you do this, the side of the face closest to the camera will be in shadow. Move the light a little more towards the camera to reduce the amount of shadow, and produce a more blended, subtle triangle effect, as shown in Figure 6.26. Eliminate or reduce the strength of the fill light for a dramatic effect, or soften the shadows further with fill light.

Figure 6.25. Arrange your main light high when working with a Rembrandt lighting effect.

Figure 6.26. Rembrandt lighting lends an Old Masters' touch to portraiture.
Side Lighting
Side lighting is illumination that comes primarily directly from one side, and is good for profile photos. Side lighting comes primarily directly from one side of the camera. You can use it for profiles or for "half-face" effects like the Fab Four on the much copied/parodied cover of Meet the Beatles/With the Beatles. The amount of fill light determines how dramatic this effect is. You can place the main light slightly behind the subject to minimize the amount of light that spills over onto the side of the face that's toward the camera. Figure 6.27 shows you how to set up lights for side lighting, and Figure 6.28 shows the results. Note that a subject with long hair that covers the cheeks may have most of their face obscured when sidelit in this way. Either comb the hair back or go for the mysterious look that my model requested in this case.

Figure 6.27. Side lighting is applied with most of the light coming from one side.

Figure 6.28. Side lighting can create dramatic profile photos.
Backlighting
With a backlit photo, most of the illumination comes from behind the subject and doesn't really light the subject as much as it defines its edges. Use additional fill light to provide for detail in the subject's front. You can use the background light for backlighting, and put your main and fill lights to work in a subordinate roll by reducing their intensity. Or, you can use the main light as the backlight, as shown in Figure 6.29 (place it below or above the camera's field of view), and fill in the shadows with your fill light. Figure 6.30 shows the final results. I didn't go for the wildly overlit, backlit glamour look in this case because the teenager in the photo is only 14 years old, and not quite ready for femme fatale-dom.

Figure 6.29. Use your main light or background light to backlight your subject.

Figure 6.30. Backlighting helps define the edges of a portrait subject.
No comments:
Post a Comment