Now you know the basics. It's time to set up some real-life scenarios and see just how you'd tackle them with a digital camera. This section will take you through a few typical action photography assignments.
Preparation and Setup
Before you go out on the shoot, it's a good idea to make sure you're well-prepared. You'll never get good pictures of any type if you don't do the right prep and setup beforehand, but action photography is particularly unforgiving. If you goof, forget an important accessory, or neglect to take care of a crucial detail you probably won't be able to go home and get what you need, nor find a substitute. So, following a checklist like this is a good idea:
Before you go out on the shoot, it's a good idea to make sure you're well-prepared. You'll never get good pictures of any type if you don't do the right prep and setup beforehand, but action photography is particularly unforgiving. If you goof, forget an important accessory, or neglect to take care of a crucial detail you probably won't be able to go home and get what you need, nor find a substitute. So, following a checklist like this is a good idea:
- Three of everything. If you're working professionally, an excuse like "My camera/flash/batteries didn't work" won't fly. Amateurs working a once-in-a-lifetime (or once-in-a-season) event won't want their style cramped by an equipment failure, either. That's why I try to own at least three or four of every important piece of equipment, and take at least two of them along on every shooting expedition. In my case, that includes having a backup digital camera, but that might not be practical for you. However, you'll want to include extra sets of batteries, more digital film than you think you'll need, and maybe a backup flash unit. If you have problems with one item, just switch to your alternate and you're back in business.
- Charge your batteries. Nickel Metal Hydride batteries can be recharged at any time without causing any detrimental side-effects, so you'll want to give all your batteries a fresh jolt just before embarking on any important photo journey. Your camera battery should be freshly charged. Have a spare battery if you think you might be taking more pictures than your original set will handle. Remember that flash pictures take more juice.
- Erase or format your film. It's not enough to have memory cards. Your cards must have room on them for new pictures. Take some time to copy any pictures you want to keep to your computer, erase your card, or, perhaps reformat it so it's fresh and ready to use.
- Learn your controls. If you don't use a particular feature regularly, now is the time to check yourself out and make sure you remember how to use it. How do you set your camera for continuous sequences? Can you switch to shutter priority exposure mode quickly? I created a little cheat sheet I tuck in my camera bag, and can look up the most obscure feature in a few seconds, on location.
- Make your basic camera settings now. Don't wait until you're ready to begin taking pictures to set your camera's ISO rating, exposure mode, or focusing method. You can make changes later, but it's best to start off with all your basic settings locked in and ready to go.
- Clean and protect your equipment. Few good pictures (other than soft-focus portraits) can be taken with a dirty lens. Carefully clean your lens. If it's going to rain or snow, put a skylight filter on the lens. You can wipe the filter off quickly, and if it should become scratched, throw it away and install a new one. If necessary, make a "raincoat" for your camera out of a resealable sandwich bag with a hole cut in it for the lens to stick out of.
What ISO Speed Should I Use?
The lowest ISO speed your camera offers usually provides the best quality overall, but may not have enough sensitivity to allow a useful range of shutter speeds and f-stops. Of course, as you increase the ISO rating of your digital camera, your pictures will begin to display noise, as you can see in Figure 5.26. You should use the lowest ISO setting that will let you shoot at the shutter speeds you want to use.

Figure 5.26. Higher ISO ratings produce more noise, which shows up as multicolored grain in your photographs.
Although digital ISO ratings don't exactly correspond to film ISO speeds, they are close enough that you can use them to estimate what setting to use. In bright sunlight, the reciprocal of an ISO rating will usually equal the shutter speed called for at an f-stop of f16. The numbers are rounded to the nearest traditional shutter speed to make the calculation easier. So, at f16, you can use a shutter speed of 1/100th-1/125th second at ISO 100; 1/200-1/250th second with an ISO rating of 200; 1/400-1/500th second at ISO 400; and perhaps up to 1/1000th second at ISO 800.
Use this rule of thumb to help you determine which ISO rating is appropriate. If you're shooting racing cars going 200 mph across the frame, you might want a shutter speed of 1/1000th second. If you can live with an f-stop of f8, that means you'll need to use an ISO rating of 200. (ISO 200 translates to 1/250th second at f16, which is the exposure equivalent of 1/1000th second at f8. This is the sort of translation photographers can do in their head without thinking.)
Of course, in bright sunlight, such as on the beach or in the snow, you can cut the ISO rating in half to get the same exposure. ISO 200 will get you 1/1000th second at f11 on a ski slope, for example.
Instead, use this rule of thumb to estimate how much action-stopping power you have in a particular situation. For example, if the sun is truly bright, you might want to set your camera's shutter speed to 1/2000th second (if it's available), either manually or through the camera's shutter priority mode, and let the autoexposure system choose the correct aperture. The faster the shutter speed you want to use, the higher the ISO rating you'll need to use.
In darker surroundings, such as indoors, or at night, the ISO rating will be correspondingly higher so you can use a particular shutter speed. However, you can expect to use the higher end of your digital camera's sensitivity scale. Unless the non-daylight location is remarkably bright, you'll probably always be using ISO 400 or higher for action photography. Over the years, I've discovered you can usually expect enough light to shoot at 1/125th second at f2.8 with an ISO setting of 400, and 1/250th second at f2.8 with an ISO setting for 800. In modern facilities, you'll probably encounter quite a bit more light than that, but even twice as much illumination is no picnic when you can use only 1/500th second at an f-stop like f2.8 with a noisy ISO rating like 800. Many digital cameras don't even offer an f-stop as large as f2.8. One of my favorite digital cameras has a maximum aperture of f2.6 to f5.1, depending on the zoom setting used.
What Exposure Do I Use?
Whether you're specifying the shutter speed and letting the camera determine the exposure, or making settings completely manually, you can't always simply set the shortest possible shutter speed and then forget about it. There are some other factors to take into account:
Whether you're specifying the shutter speed and letting the camera determine the exposure, or making settings completely manually, you can't always simply set the shortest possible shutter speed and then forget about it. There are some other factors to take into account:
- You'll need a smaller f-stop (the larger numbers) with longer lenses/greater zoom settings, to provide adequate depth-of-field.
- Digital cameras offer more depth-of-field at a given magnification, so you don't have to be afraid of what is considered a wide lens opening in the film camera world: f5.6 may be entirely usable even at a telephoto setting.
- Digital camera images can get dramatically noisy at higher ISO ratings, such as ISO 800, so you might want to choose the highest rating only when you want to use the very fastest shutter speeds and the smallest possible lens opening.
- Bright sunlight can change significantly when a cloud moves in front of the sun. You can quickly lose half your available light. Your camera's autoexposure system can compensate, of course, but you may not like the results. You can end up with a lens opening that's too wide, or your camera may refuse to take a picture at all. When that happens, choose a slower shutter speed or, as a last resort, bump your camera's ISO rating up a notch.
Planning Your Shot
If you've taken my advice on where to position yourself, you'll still need to plan your shot before you shoot. Try to anticipate the action as much as you can. What's coming next? It may be a serve, a shot on goal, some sidelines action, an impending dunk, or some other bit of action. Sports moves so rapidly that you can spend an entire event constantly chasing the current hot action, and miss it every time. Don't waste time constantly zooming in and out. Rather than trying to constantly reframe your picture as the event unfolds around you, it's often best to point your lens at the approximate point where the action you hope for will take place. Plan for a particular kind of shot and then wait for it. If you're at a football game and it's third down with 22 yards to go, choose a receiver near you and follow him on his route. If you're lucky, a pass will come his way and you'll get a great shot. With only a few yards to go, plan for a running play, like the one shown in Figure 5.27.

At a tennis match, look for a smash to a far corner when a hapless opponent has been lured too close to the net. If your hockey team is on the attack, watch for a cross-rink pass to an open man who has a shot at the goal. Prefocus on the spot, watch your participants both inside and outside the frame (I tend to peer through the viewfinder with one eye and keep the other eye open to take in the big picture), and be ready to snap.
If you've taken my advice on where to position yourself, you'll still need to plan your shot before you shoot. Try to anticipate the action as much as you can. What's coming next? It may be a serve, a shot on goal, some sidelines action, an impending dunk, or some other bit of action. Sports moves so rapidly that you can spend an entire event constantly chasing the current hot action, and miss it every time. Don't waste time constantly zooming in and out. Rather than trying to constantly reframe your picture as the event unfolds around you, it's often best to point your lens at the approximate point where the action you hope for will take place. Plan for a particular kind of shot and then wait for it. If you're at a football game and it's third down with 22 yards to go, choose a receiver near you and follow him on his route. If you're lucky, a pass will come his way and you'll get a great shot. With only a few yards to go, plan for a running play, like the one shown in Figure 5.27.

Figure 5.27. Watch for a hole your runner can burst through.
At a tennis match, look for a smash to a far corner when a hapless opponent has been lured too close to the net. If your hockey team is on the attack, watch for a cross-rink pass to an open man who has a shot at the goal. Prefocus on the spot, watch your participants both inside and outside the frame (I tend to peer through the viewfinder with one eye and keep the other eye open to take in the big picture), and be ready to snap.
Freezing the Action
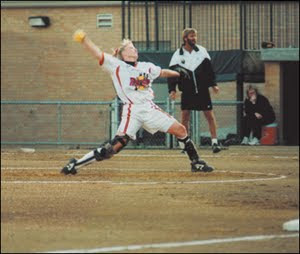
Freezing a fast-moving subject in its tracks seems to be the primary goal of action photographers. However, a moment frozen in time may not be the best or most interesting way to capture your subject. Frequently, a little motion blur adds to the feeling of motion, as in Figure 5.28, in which the blurriness of the softball player's arm and back leg help convey the action.
In fact, including a little blur in your pictures is more difficult and challenging than simply stopping your subjects in their tracks. Some of the best action pictures combine blur with sharpness to create a powerful effect. Now that you understand that, I'll explain a little about how to freeze and semi-freeze the action.
The first thing to understand is that motion looks different to the camera, depending on the direction, speed, and distance of the subject. You can use this information as you plan your image. Here are the basics:
Freezing a fast-moving subject in its tracks seems to be the primary goal of action photographers. However, a moment frozen in time may not be the best or most interesting way to capture your subject. Frequently, a little motion blur adds to the feeling of motion, as in Figure 5.28, in which the blurriness of the softball player's arm and back leg help convey the action.
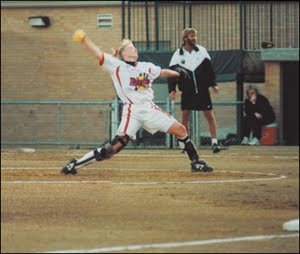
Figure 5.28. The blur of the pitcher's arm and leg add to the feeling of motion.
In fact, including a little blur in your pictures is more difficult and challenging than simply stopping your subjects in their tracks. Some of the best action pictures combine blur with sharpness to create a powerful effect. Now that you understand that, I'll explain a little about how to freeze and semi-freeze the action.
The first thing to understand is that motion looks different to the camera, depending on the direction, speed, and distance of the subject. You can use this information as you plan your image. Here are the basics:
- Motion that's parallel to the plane of the sensor (that is, across the width or height of an image in a horizontal, vertical, or diagonal direction) appears to move the fastest and will cause the most blur. So, an automobile passing in front of your camera at 200 mph is likely to be blurry, no matter how short your shutter speed.
- Motion coming toward the camera appears to move much slower, and will cause a much lesser amount of blur. That same race car headed directly toward you can be successfully photographed at a much longer shutter speed.
- Motion coming toward the camera on a slant (perhaps a runner dashing from the upper left background of your frame to the lower right foreground) will display blur somewhere between the two extremes.
- Subjects that are closer to the camera blur more easily than subjects that are farther away, even though they're moving at the same speed. That's because the motion across the camera frame is more rapid with a subject that is closer to the camera.
- Blur is relative to the camera's motion, so if you pan the camera to follow a fast moving object, the amount of blur of the object you're following will be less than if the camera remained stationary and the object darted across the frame.
- There are two different kinds of blur to contend with: subject motion and camera motion. The former happens because your subject is moving faster than the selected shutter speed can stop. The latter occurs when the camera isn't held steady during an exposure. With panning, described next, you may get both kinds of blur in one photo.
Stopping Action with Panning
The term panning derives from the motion picture industry, from a camera swiveling motion used to follow action as it progresses from one side of the frame to the other. (You can also "pan" vertically [technically, it's called tilting], of course, as when the camera follows the take-off of a rocket into space; it's just that horizontal panning is more common than tilting.)
So, a marathon runner is racing across your field of view. If she's close enough and moving fast enough, even your highest shutter speed may not be able to stop the action. So, instead, you move the camera in the same direction that the runner is moving. Her apparent speed is much slower, relative to the camera, so a given shutter speed will be able to freeze the action more readily. Blur from subject motion is reduced. Yet, the background will display more blur, due to camera motion. Your photograph may have a tack sharp runner surrounded by a blurry background. That's probably a more exciting and dramatic photograph.
Panning can be done with a handheld camera, or with a camera mounted on a tripod that has a swiveling panorama (pan) head. The more you practice panning, the better you'll get at following the action. You might find that if your panning speed closely matches the subject's actual speed, a shutter speed as slow as 1/60th to 1/125th second can produce surprisingly sharp images. Use of a lower shutter speed causes the background to appear more blurry, too.
To pan effectively, you should try to move smoothly in the direction of the subject's movement. If your movement is jerky, or you don't pan in a motion that's parallel to the subject's motion, you'll get more blurriness than you anticipate or want. Take a step back, if you can. The farther the subject is from the camera, the longer you'll have to make your pan movement, improving potential sharpness.
Panning is a very cool effect because of the sharpness of the subject, the blurriness of the background, and some interesting side effects that can result. For example, parts of the subject not moving in the direction of the overall pan will be blurry, so your marathon runner's body may be sharp, but her pumping arms and legs will blur in an interesting way.
Panning is interesting even when you don't use it to totally stop the action. Figure 5.29 shows a baseball player crossing first base, captured using a 1/30th second shutter speed and panning to create a more interesting semi-blurred look.

Freezing Action Head On
Another way to stop action is to photograph the subject as it heads towards or away from you. A runner who is dashing towards the camera can be effectively frozen at 1/250th or 1/125th second, but would appear hopelessly blurred when crossing the frame (if you're not panning). Head-on shots can be interesting, too, so you might want to use this angle even if you're not trying to boost your effective shutter speed. Figure 5.30 was exposed under the stadium lights at a paltry 1/250th second, but because everyone in the shot is running towards the camera, the action is effectively frozen.

The term panning derives from the motion picture industry, from a camera swiveling motion used to follow action as it progresses from one side of the frame to the other. (You can also "pan" vertically [technically, it's called tilting], of course, as when the camera follows the take-off of a rocket into space; it's just that horizontal panning is more common than tilting.)
So, a marathon runner is racing across your field of view. If she's close enough and moving fast enough, even your highest shutter speed may not be able to stop the action. So, instead, you move the camera in the same direction that the runner is moving. Her apparent speed is much slower, relative to the camera, so a given shutter speed will be able to freeze the action more readily. Blur from subject motion is reduced. Yet, the background will display more blur, due to camera motion. Your photograph may have a tack sharp runner surrounded by a blurry background. That's probably a more exciting and dramatic photograph.
Panning can be done with a handheld camera, or with a camera mounted on a tripod that has a swiveling panorama (pan) head. The more you practice panning, the better you'll get at following the action. You might find that if your panning speed closely matches the subject's actual speed, a shutter speed as slow as 1/60th to 1/125th second can produce surprisingly sharp images. Use of a lower shutter speed causes the background to appear more blurry, too.
To pan effectively, you should try to move smoothly in the direction of the subject's movement. If your movement is jerky, or you don't pan in a motion that's parallel to the subject's motion, you'll get more blurriness than you anticipate or want. Take a step back, if you can. The farther the subject is from the camera, the longer you'll have to make your pan movement, improving potential sharpness.
Panning is a very cool effect because of the sharpness of the subject, the blurriness of the background, and some interesting side effects that can result. For example, parts of the subject not moving in the direction of the overall pan will be blurry, so your marathon runner's body may be sharp, but her pumping arms and legs will blur in an interesting way.
Panning is interesting even when you don't use it to totally stop the action. Figure 5.29 shows a baseball player crossing first base, captured using a 1/30th second shutter speed and panning to create a more interesting semi-blurred look.

Figure 5.29. Panning doesn't eliminate the blur, but it creates a more dynamic-looking photo.
Freezing Action Head On
Another way to stop action is to photograph the subject as it heads towards or away from you. A runner who is dashing towards the camera can be effectively frozen at 1/250th or 1/125th second, but would appear hopelessly blurred when crossing the frame (if you're not panning). Head-on shots can be interesting, too, so you might want to use this angle even if you're not trying to boost your effective shutter speed. Figure 5.30 was exposed under the stadium lights at a paltry 1/250th second, but because everyone in the shot is running towards the camera, the action is effectively frozen.

Figure 5.30. Everybody is headed towards the camera, so even 1/250th of a second shutter speed can stop the action.
Freezing Action with Your Shutter
A third way to stop motion is to use the tiny time slice your shutter can nip off. A fast shutter speed can stop action effectively, no matter what the direction of the motion. The trick is to select the shutter speed you really need. A speed that is too high can rob you of a little sharpness because you've had to open the lens aperture a bit to compensate, or use a higher ISO rating that introduces noise. There are no real rules of thumb for selecting the "minimum" fastest shutter speed. As you've seen, action stopping depends on how fast the subject is moving, its distance from the camera, its direction, and whether you're panning or not.
Many cameras include shutter speeds that, in practice, you really can't use. The highest practical speed tops out at around 1/2,000th second. With a fast lens and a higher ISO rating, you might be able to work with 1/4,000th second under bright illumination. Yet, there are digital cameras available that offer shutter speeds as brief as 1/16,000th of a second. So, the bottom line is usually that, to freeze action with your shutter speed alone, you'll probably be using a speed from 1/500th second to 1/2,000th second, depending on the illumination and what your camera offers. The only time I've really used any faster shutter speed was once when I tried 1/2,500th second while handholding a 500mm lens.
A shutter speed that's fast enough can freeze even the fastest-moving objects, such as the boat in the flume ride shown in Figure 5.31 (which is a reminder that action shots don't have to involve sports).

Figure 5.31. A fast enough shutter speed can freeze things that seem a blur to our eyes, such as droplets of falling water.
Freezing Action with Electronic Flash
Electronic flash units, originally called "strobes" or "speedlights," are more than a great accessory for artificial illumination. The duration of an electronic flash is extremely brief, and if the flash provides the bulk of the illumination for a photograph, some great action stopping results. One of the earliest applications of electronic flash was by Dr. Harold Edgerton at MIT, who perfected the use of stroboscopic lights in both ultra-high-speed motion and still (stop-motion) photography capable of revealing bullets in flight, light bulbs shattering, and other phenomena.
Some flash units have a duration of 1/50,000th second or less, which is very brief, indeed. One way of controlling an automated flash unit is to vary the duration of the flash by using only part of the stored energy that's accumulated in the unit's capacitors.
If the subject is relatively far away, the entire charge is fed to the flash tube, producing the longest and most intense amount of illumination. If the subject is relatively close, only part of the charge is required for the photograph, and only that much is supplied to the flash tube, producing an even briefer flash. Yet, even the longest flash exposure is likely to be shorter than your camera's shutter speed, so electronic flash is an excellent tool for stopping action.
The chief problem with electronic flash is that, like all illumination, it obeys that pesky inverse-square law. Light diminishes relative to the inverse of the square of the distance. So, if you're photographing a subject that's 12 feet away, you'll need four times as much light when the subject is twice as far away at 24 feet, not twice as much. Worse, if an athlete in your photograph is 12 feet away when you snap a picture, anything in the background 24 feet away will receive only one quarter as much light, giving you a dark background.
That generally means that a digital camera's built-in electronic flash is probably not powerful enough to illuminate anything two-dozen feet from the camera. You might be able to use your camera's flash at a basketball game, but not at a football game where the distances are much greater. A more powerful external flash unit, like the ones discussed earlier in this chapter, might be called for.
Figure 5.32 is a flash picture all the way (see the reflection off the runner's eyeballs?), but the electronic flash has frozen the action crisply.

Figure 5.32. Electronic flash stops fast-moving subjects in their tracks, even if the linebackers can't.
Freezing Peak Action
The final method for freezing fast motion is simple: Wait for the motion to stop. Some kinds of action include a peak moment when motion stops for an instant before resuming again. That's your cue to snap a picture. Even a relatively slow shutter speed can stop action during one of these peak moments or pauses.
The end of a batter's swing, a quarterback cocking his arm to throw a pass, a tennis player pausing before bringing a racket down in a smash. These are all peak moments you can freeze easily. Other peaks are trickier to catch, such as the moment when a basketball player reaches the apex of a leap before unleashing a jump shot. If you time your photograph for that split second before the shooter starts to come down, you can freeze the action easily.
Non-sports action sequences also have peak moments. An amusement park ride might pause for as long as a second between hair-raising swings. Your child leaping about on a trampoline reaches the top of a jump (just like the ski jumper shown in Figure 5.33) and can be captured in mid-flight. A bird in flight, like the stork in Figure 5.34, flaps its wings furiously to gain altitude, then stretches out to glide leisurely for minutes at a time. If you study the motion of your action subjects, you'll often be able to predict when these peak moments will occur.

Figure 5.33. At the top of his arc, this summertime ski jumper pauses for a moment, and can be captured with ease.

Figure 5.34. A stork's wings are motionless as it glides silently through the air, so freezing this moment is easy.
No comments:
Post a Comment